|
|
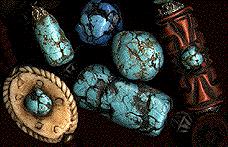 |
Turquoise is a semi-precious blue stone found in earth, most plentifully in the Middle East and the American southwest. Turquoise often includes bits of the rock or soil it was found in. This surrounding substance is called the "matrix", or mother rock, and it is sometimes distributed throughout the stone, forming interesting veined patterns in the turquoise. Natural turquoise varies in color from an intense sky blue to paler blue to greenish-blue, and can be mottled or evenly colored. The matrix is usually tan, brownish or black.
(Credit is due to clay artist Tory Hughes, who pioneered the use of imitative techniques for polymer clay, including the food-processor technique for turquoise. I've never taken a class from her, but I hope to some day.)
You can use any of the polymer clay brands for this project. Natural turquoise varies quite a bit in color, from the greenish blue of African turquoise to the bright blue of turquoise from the American Southwest, so you should feel free to experiment with color to get the most pleasing results. The best colors I've found are Sculpey turquoise (formerly called "aqua") and Fimo light turquoise, with admixtures of white and light green.
My favorite formula is a mixture of two packages of Sculpey III turquoise, one of pearl green, and half a package of white; this produces a slightly greenish blue. If you want a brighter blue, you can use just the turquoise. If you prefer to use Fimo, try using light turquoise straight from the package, or mix it with mint and white.
After conditioning your clay as usual, and mixing colors if you're using a mixture, divide the clay into walnut-size balls and chill it until it's very firm, but not frozen solid.
Use the food processor to chop several balls of clay at a time. You want to get tiny lumps around an eighth of an inch, with jagged corners. Don't process the clay for too long; if the clay gets warm, the corners of the lumps will be smooth instead of jagged.
If you don't have a food processor, you can create the lumps this way: roll a sheet of clay, use a sharp knife to slice it in long narrow strips, then make irregular slanted cuts across each strip to create small lumps. If you're using a soft clay brand, chilling the sheet before slicing it is recommended to ensure your lumps are jagged enough for a realistic appearance. (Thanks to Pörrö Törrönen for originating this new method.)
The easiest way to do this is to dump the clay onto your work surface and pour half an ounce or so of paint and a few drops of water onto it. If you're using potting sand, add a pinch of it. If you're using tissue, pour a few drops of water onto it and shred it between your fingers. Toss all these ingredients gently with your hands, like a salad. You want to get all the clay lumps coated with the paint mixture, which will make the dark veining in the final piece.
For the best results, be fairly gentle when shaping: you don't want to squash the clay out of shape or smooth the jagged edges of the clay lumps. Press the clay just hard enough to make the lumps stick together and hold the shape you want. You can roll the piece gently between your hands to smooth the surface, but remember that overhandling will make the finished piece look less natural. When finished shaping beads, pierce them carefully to avoid crumbling.
![[Ugly turquoise right after firing]](turquoise-unsanded.jpg) Fire using the temperature and time you normally use. When the pieces come out of the oven, the matrix coating makes them look like hideous little brown lumps. Don't worry; this is normal. You'll get rid of this ugly coating to show the turquoise beneath in the next step.
Fire using the temperature and time you normally use. When the pieces come out of the oven, the matrix coating makes them look like hideous little brown lumps. Don't worry; this is normal. You'll get rid of this ugly coating to show the turquoise beneath in the next step.
Because you need to remove the outermost layer of paint, you should start with a fairly coarse grade of wet/dry sandpaper for this project - about 220. Holding the piece under water, sand the outer coating off until you are satisfied with the veining and surface appearance.
You can get a different look by continuing to sand until the surface is smooth, rather than leaving it lumpy; since the paint "matrix" is embedded between the clay chunks as well as on the surface, you won't remove it completely by further sanding.
When you like the look of the piece, sand it with fine sandpaper, starting with 400 grit, then buff it to bring out a shine. (If you used potting sand in the piece, you may need to change sandpaper more often than you're used to, because the sand embedded in the piece will abrade the sandpaper and make it wear out sooner than usual.)
Here are a few things you can do with faux turquoise:
It's particularly fun to make things that can't be done with natural turquoise, taking advantage of the versatility the clay offers.
Large, chunky beads work well with an irregularly-shaped, bumpy surface that's been sanded only enough to remove the matrix coating; smaller and more delicate objects look better if you sand them enough to get a smooth surface.
Faux turquoise goes well with dark colors - black, terra cotta, and brown - and faux ivory beads. Mix it with oxidized (blackened) silver beads for a Southwestern look. Take a look in the gallery to see some pieces that use this technique.