|
|

 |
Imitative techniques - ways of making polymer clay appear to be another material - are favorites among clay artists. Clay is cheaper and easier to work with than such materials as ivory, wood, and turquoise. And in clay, you can do many things - embossing, working with larger pieces than occur in nature, experimenting with color - that would be difficult or impossible using the natural substance.
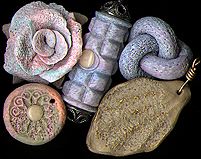
The stone clays - Granitex and stone Fimo - give clay artists new ways of imitating rocks and semiprecious stones such as granite, jasper, and quartz.
As an example, this project leads you through the steps of making a pendant - rough or polished - with one or more tiny inlaid pieces of "quartz". These techniques can be applied to any polymer-clay piece: beads, pendants, boxes, or decorative items.
You can use either stone Fimo or Granitex for this project. Both brands contain a colored clay plus bits of fiber to add color variations that won't blend in as you work with the clay. For a more realistic look, consider mixing two or three compatible colors to make a veined appearance; gray, green, and brown is a good combination.
You'll also need a small amount of translucent clay for the inlay. You can use any translucent clay for this.
Step 1: Making the Translucent Inlay
After conditioning the translucent clay, pinch off a bit, roll it into a ball, and press it against your work surface to form a disk about one-quarter of an inch in diameter. Depending on the final design you plan for the pendant, you may want to make one inlay for the center, or several to place at different points on the design.
Fire the inlays for ten to fifteen minutes. (Remember that translucent clay may require a lower firing temperature to avoid discoloration.) When the inlays cool, rub them with the steel wool to smooth them, then buff them to a shine, using a buffer or a piece of rough cloth.
Step 2: Preparing the Clay
Condition the stone clay as usual. (Thoroughly conditioning stone clay will not cause the color variations to disappear; the fibers remain separate from the clay.) If you're using more than one color, marble them together until you're satisfied wth the look. Form a ball about an inch in diameter, then flatten it into a thick disk.
If you want your pendant to have a rough, freshly-quarried stone texture, roll the ball in salt before making the disk. The salt will dig little pits and scratches into the clay; when you remove the salt after firing, the texture will remain.
Step 3: Embossing the Design
Use a mold release on the object you're using to create the design, then press it into the clay disk. (If the clay is covered with salt, it will act as a mold release; you don't need to use any additional release.)
Step 4: Inlaying the Quartz
Press one or more translucent disks into the clay to accent the design. Press carefully so as not to distort the design, but make sure to embed the translucent inlays deeply enough into the clay disk to create a strong bond.
Step 5: Firing the Piece
Either pierce a hole through the top of the disk for a jump ring, or embed an eye pin into the top edge to hang the pendant from. Fire the completed pendant according to the instructions; because of the translucent clay, you may prefer to use a lower temperature than usual.
Step 6: Finishing the Surface
For a textured pendant, place the fired pendant in a bowl of lukewarm water to dissolve the salt. Scrub off the salt residue with a soft brush, then dry the piece.
For a polished pendant, wet-sand the raised portions of the design (being careful to avoid sanding the translucent inlay), then buff to a high shine.
Here are a few things you can do with stone clay:
Take a look in the gallery to see some pieces made with the look of stone.